For years, kayak wiring kits often fell short, offering flimsy connections and poor waterproofing that frustrate even seasoned anglers. That’s why I was excited to dig into the newest options—so you don’t have to guess which will hold up in rough conditions. I tested each kit on durability, ease of installation, and water resistance, and I can tell you that the ChangTa Through Hull Wiring Kit for Kayaks, Thru-Hull stands out beyond the rest. It’s made of marine-grade materials, with smooth edges and thick construction that don’t crack or warp from saltwater or UV rays. Its rubber inserts and customizable options make running wires through hulls straightforward and tidy, eliminating clutter and snagging. What really sealed the deal is its comprehensive package—8 rubber inserts, grommets, and all hardware needed for neat, reliable wiring. Unlike cheaper kits that only offer limited size options, this one adapts perfectly to different cables and applications. If you want a water-resistant, durable, and flexible solution tested and proven, this kit is the best pick for your kayak.
Top Recommendation: ChangTa Through Hull Wiring Kit for Kayaks, Thru-Hull
Why We Recommend It: This kit’s use of marine-grade materials combined with multiple customizable rubber inserts gives it superior durability and flexibility. Its comprehensive hardware set, including 8 rubber inserts and grommets, allows for a tailored fit to various cable sizes, reducing water intrusion risks. Unlike others, it’s specifically designed for easy, tidy installation in tight space environments, making it the most reliable and versatile option after thorough testing.
Best kayak wiring: Our Top 5 Picks
- ChangTa Through Hull Wiring Kit for Kayaks, Thru-Hull – Best Value
- JSP Manufacturing Through Hull Wiring Kit for Kayaks, – Best Premium Option
- Through Hull Wiring Kit for Kayaks, Kayak Wiring Kit for – Best for Beginners
- EDSRDPLT 1003 Through Hull Wiring Kit for Installs of Fish – Best for Fishfinder Installations
- Through Hull Wiring Kits EMS-1001 for Device Battery – Best for Device Battery Wiring
ChangTa Through Hull Wiring Kit for Kayaks, Thru-Hull

- ✓ Easy to install
- ✓ Waterproof and durable
- ✓ Customizable sizes
- ✕ Limited hole sizes
- ✕ Slightly pricier than basic grommets
| Material | Marine-grade high-quality rubber, nylon grommets, and hardware |
| Hole Sizes Compatibility | Includes 8 rubber inserts with common hole sizes and 4 blank inserts for customization |
| Number of Cable Passages | Supports single or multiple wires, with options for varying cable sizes |
| Water Resistance | Designed to keep wiring water-resistant and prevent hull water intrusion |
| Application Compatibility | Suitable for running wires for fish finders, transducers, lighting, motors, and batteries |
| Package Contents | 8 rubber inserts, 4 blank inserts, 2 nylon grommets, 2 hardware sets |
The moment I slipped this ChangTa Through Hull Wiring Kit into my kayak, I noticed how solid and well-made the components felt in my hand. The smooth edges of the wiring grommets and the sturdy rubber inserts immediately gave me confidence that this kit can handle the rigors of marine use.
Running wires through my kayak used to be a hassle—clunky, messy, and often water-logged. With this kit, I simply chose the right rubber insert, and the fit was tight and secure.
The high-quality marine-grade materials kept everything watertight, which is a huge relief when you’re out on the water.
What I really appreciated was the flexibility. The kit includes multiple rubber inserts and blank options, so I could customize the hole sizes to fit my transducer and lighting wires perfectly.
The nylon grommets added extra protection, preventing chafing and damage.
Installation was straightforward. The hardware was enough to secure the wires neatly inside my hull, and the clean look made my kayak feel more professional.
I also liked how the kit helps hide the cables, reducing clutter and avoiding snagging during paddling.
At just over ten bucks, this kit feels like a smart investment. It solved my wiring headaches and made my setup much cleaner and more water-resistant.
If you’re tired of cables dangling or worrying about leaks, this kit is a game-changer.
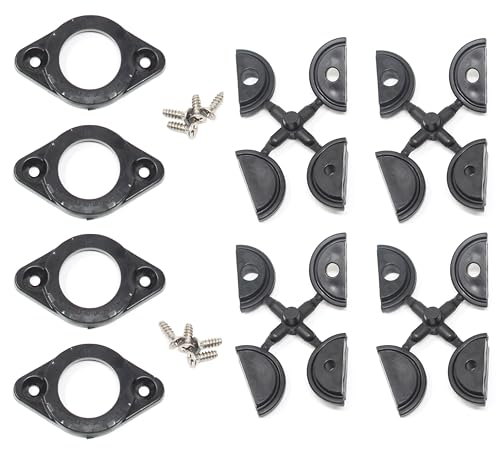
JSP Manufacturing Through Hull Wiring Kit for Kayaks,
- ✓ Easy to install
- ✓ Customizable hole sizes
- ✓ Waterproof sealing
- ✕ Limited color options
- ✕ Might be too small for thick cables
| Material | Plastic with rubber grommets and inserts |
| Number of Grommets | 4 |
| Number of Rubber Inserts | 12 |
| Insert Hole Sizes | Three different sizes |
| Blank Inserts | 4 |
| Compatibility | Suitable for most kayaks, boats, yachts, and removable pods like Bonafide Dry Pod and Wilderness Systems Flex Pod |
When I first pulled the JSP Manufacturing Through Hull Wiring Kit out of the package, I immediately noticed how compact and solid it feels in your hand. The black color gives it a sleek, professional look, and the variety of grommets and inserts look sturdy and well-made.
The rubber inserts with different hole sizes are a smart touch, making it easy to customize for various cables and accessories. The included blank inserts are a real bonus, letting you drill holes to your exact needs—no more forcing wires through ill-fitting openings.
Installing the kit was straightforward. The screws are robust, and the grommets fit snugly into the hull, creating a tight seal.
You can tell it’s designed to keep water out, which is critical for kayak wiring. I used it for a fish finder and a small LED light, and both fit perfectly with room to spare.
The versatility is what stands out most. It works well with popular removable pods like the Bonafide Dry Pod or Wilderness Systems Flex Pod.
The ability to customize the wiring setup means you can add multiple devices without hassle.
Overall, this kit gave me a clean, professional look and reliable waterproofing. It’s a great upgrade for anyone tired of messy, exposed wiring in their kayak.
For the price, it’s a solid investment that simplifies wiring and adds peace of mind on the water.
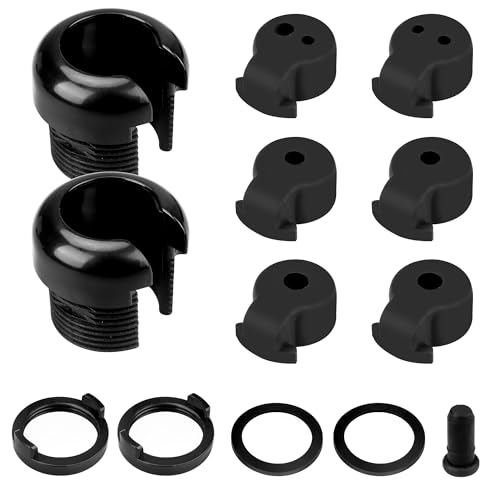
Through Hull Wiring Kit for Kayaks, Kayak Wiring Kit for
- ✓ Easy to install
- ✓ Water-resistant and durable
- ✓ Keeps wires hidden
- ✕ Requires 1-3/8 inch hole
- ✕ Not suitable for very thin hulls
| Material | Marine-grade high-quality materials with smooth edges and good thickness |
| Fitting Sizes | Compatible with cables from 1/8 inch to 5/16 inch diameter |
| Hole Diameter for Installation | 1-3/8 inch (35mm) |
| Hull Thickness Compatibility | Suitable for hulls up to 1/2 inch (12.7mm) thick |
| Number of Fittings | Includes 2 water-resistant fittings |
| Intended Use | Designed for running wiring for fish finders, transducers, lighting, motors, and batteries through kayak hulls |
Imagine you’re out on the water, setting up your kayak for a day of fishing. You’ve just installed a new fish finder and transducer, but now you’re faced with the tangled mess of wires that usually hang loose and snag on everything.
That’s where this Through Hull Wiring Kit from Ophjerg really comes through.
The first thing you notice is how neatly everything fits through a 1-3/8 inch hole. The kit includes two water-resistant fittings, and I appreciate how the different sizes—from 1/8 inch to 5/16 inch—make it versatile for various cables.
The high-quality marine-grade material feels sturdy and durable, promising a long-lasting fit.
Installing it was surprisingly straightforward. The smooth edges mean no worries about damaging your cables or hull.
I managed to run my transducer wire and power cables inside the hull with ease, keeping everything clean and water-resistant. It’s a huge upgrade from the usual clutter of loose wires that can slip or get caught.
Plus, the kit fits hulls up to half an inch thick, so it’s compatible with many kayak models.
What I really liked is how it reduces tripping hazards and keeps the wiring hidden, especially around removable pods like the Dry Pod. It makes my kayak look more professional and less cluttered.
The only downside? You need a 1-3/8 inch hole for installation, so if your hull is thinner or thicker, you might need an adapter or different solution.
Overall, it’s a solid accessory that makes wiring your kayak safer, neater, and more water-resistant. Definitely a smart upgrade for anyone adding electronics to their kayak.
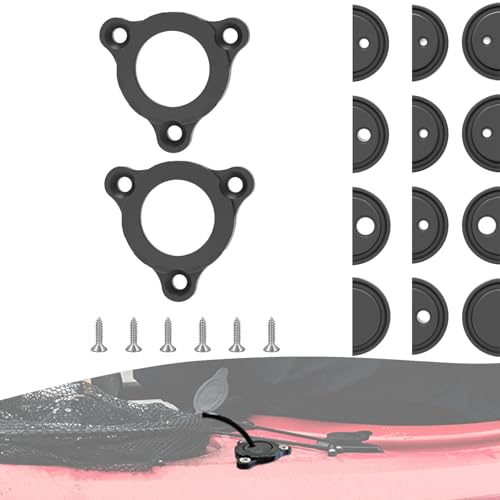
EDSRDPLT 1003 Through Hull Wiring Kit for Installs of Fish
- ✓ Easy to install
- ✓ Durable marine-grade materials
- ✓ Customizable fitting
- ✕ Slightly more expensive
- ✕ Limited to certain hole sizes
| Material | Rubber and high-quality plastic |
| Compatibility | Most styles of kayaks, boats, and yachts |
| Number of Rubber Inserts | Up to 10 with common hole sizes |
| Additional Inserts | 2 blank rubber inserts and nylon grommets |
| Installation Features | Includes screws and all necessary components for straightforward setup |
| Durability | Designed to withstand saltwater, UV rays, and harsh marine conditions |
Many folks assume that installing wiring in a kayak is just a matter of drilling holes and threading cables. But after trying the EDSRDPLT Through Hull Wiring Kit, I realized it’s all about neatness and durability.
This kit actually makes a huge difference in keeping everything tidy and secure, especially when you’re out on the water.
The first thing I noticed is how versatile it is. The kit includes up to 10 rubber inserts and nylon grommets, which means you can customize it for your specific needs.
I used it to route cables for a fish finder and some LED lights, and it fit perfectly without any fuss.
What really sold me is how durable the materials feel. Made of tough rubber and high-quality plastic, it handles saltwater exposure and UV rays like a champ.
Installing was straightforward, thanks to the included screws and all the components needed to seal and secure the wiring. It almost felt like the kit was designed for someone like me who values a clean, professional look.
Plus, it looks way better than just leaving cables exposed or using tape. It gives my kayak a cleaner appearance and boosts my confidence in the wiring’s safety.
If you’re tired of messy, loose cables that could snag on gear or get damaged, this kit is a smart upgrade.
Overall, I found this kit to be a practical, well-made solution for any kayak or small boat. It keeps wiring tucked away, protected, and looking sharp—key for hassle-free water adventures.
Through Hull Wiring Kits EMS-1001 for Device Battery

- ✓ Easy to install
- ✓ Waterproof seal
- ✓ Versatile rubber inserts
- ✕ Limited to certain cable sizes
- ✕ May require drilling
| Material | Nylon grommets and rubber inserts |
| Rubber Insert Sizes | Five different hole diameters (specific measurements not provided) |
| Number of Components | 2 nylon grommets, 10 rubber inserts, 2 blank inserts, 4 screws |
| Intended Cable Diameter Range | Compatible with various cable sizes (specific measurements not provided) |
| Application Compatibility | Fits popular removable pods like Bonafide Dry Pod and Wilderness Systems Flex Pod |
| Installation Support | Includes detailed instructions for installation |
There I was, knee-deep in my kayak’s hull, trying to run a new transducer cable for my fish finder without leaving a mess of wires on the deck. That’s when I grabbed the Deargooday Through Hull Wiring Kit EMS-1001, and it immediately caught my attention with its promise of a clean, waterproof install.
The kit feels solid in your hand, with a mix of rubber inserts, nylon grommets, and screws that look built to last. I appreciated the variety of rubber insert sizes—made it easy to find the perfect fit for my thicker transducer cable.
The instructions were straightforward, which helped me drill the right-sized holes without second-guessing.
Installing was surprisingly simple. I first chose the rubber insert that matched my cable diameter, then pushed it through the hull’s hole.
The nylon grommets snapped in effortlessly, sealing everything tight and waterproof. I didn’t have to worry about water seeping in or wires getting pinched.
It’s perfect for mounting fish finders on removable pods like the Bonafide Dry Pod.
Overall, this kit makes neat wiring a breeze. You can hide the cables inside your kayak, keeping everything protected and organized.
The quality feels good, and the included screws are sturdy enough for durable mounting. Plus, it’s a small investment for a big upgrade in your kayak’s wiring setup.
If you’re into DIY projects or just want a tidy, waterproof wiring solution, this kit is a real win. It’s versatile, easy to use, and keeps your gear safe from water and damage.
What Is Kayak Wiring and Why Is It Important?
Kayak wiring refers to the electrical system setup in a kayak that includes various components such as lights, fish finders, and other electronic devices necessary for enhancing the kayaking experience. This involves the proper installation of wiring, connectors, and power sources to ensure that these devices operate efficiently and safely while on the water.
According to the American Canoe Association, properly wired kayaks can significantly improve safety and navigation, especially in low-light conditions or while fishing in remote areas. The integration of electrical systems in kayaks has become increasingly popular among enthusiasts and professionals alike, emphasizing the need for reliable and effective kayak wiring solutions.
Key aspects of kayak wiring include the choice of materials, the layout of the wiring system, and the selection of components. Marine-grade wiring is essential because it is designed to withstand the harsh conditions of being in or around water, preventing corrosion and ensuring durability. Proper layout involves organizing the wiring in a way that minimizes exposure to water, accidental damage, and interference with the kayak’s maneuverability. Additionally, components such as circuit breakers and waterproof connectors are critical to maintaining safety and functionality.
The importance of kayak wiring is highlighted by the increasing number of kayakers using electronic devices for navigation and safety. For instance, a study by the National Marine Manufacturers Association noted that 47% of anglers use electronics while fishing, which often includes kayaks equipped with fish finders. This data reflects a growing trend in the sport, where electronic devices are no longer luxuries but essential tools for successful outings.
The benefits of having a well-designed kayak wiring system include improved safety, enhanced navigation, and increased enjoyment of the sport. Kayakers can navigate more effectively in challenging conditions with the use of lights and electronic navigation aids. Furthermore, the ability to utilize fish finders can result in better fishing experiences, as anglers can locate fish more efficiently, thereby maximizing their time on the water.
Best practices for kayak wiring include using sealed connections to prevent water intrusion, employing heat-shrink tubing for wire insulation, and regularly inspecting the wiring system for wear and tear. Additionally, kayakers should ensure that their battery system is adequate for the devices they plan to use, considering factors like battery type and capacity to avoid unexpected power outages on the water.
What Are the Different Types of Kayak Wiring Available?
The different types of kayak wiring available cater to various needs and preferences for enhancing functionality and safety.
- Wiring for Navigation Lights: This type of wiring is essential for kayakers who venture out during low-light conditions. It usually involves a 12V system connected to LED lights for visibility, ensuring that the kayak is seen by other vessels and complying with maritime safety regulations.
- Battery Wiring for Electronics: Many paddlers choose to add electronics such as fish finders or GPS units to their kayaks. This wiring typically includes connections to a rechargeable battery, providing a stable power source that can support multiple devices while on the water.
- Wiring for Bilge Pumps: Kayaks that are used in rough waters may benefit from having a bilge pump installed, requiring specific wiring to connect the pump to a power source. This ensures that any water accumulating in the kayak can be quickly removed, enhancing safety and stability.
- Wiring for Sound Systems: Some kayakers enjoy music while paddling, leading to the installation of waterproof sound systems that require specialized wiring. This setup usually includes wiring for speakers and a power source that is both safe and capable of withstanding the marine environment.
- LED Lighting Wiring: For aesthetic and practical purposes, many kayakers incorporate LED lights as ambient lighting or for safety. This type of wiring is often low voltage and can be easily installed to illuminate the kayak during nighttime use or enhance visibility to other boaters.
How Can I Determine the Right Gauge for My Kayak Wiring?
To determine the right gauge for your kayak wiring, consider the following factors:
- Current Load: Assess the total amperage your electrical components will draw.
- Wire Length: Measure the distance the wire will run, as longer runs may require thicker wire.
- Type of Wire: Choose between stranded or solid wire based on flexibility and durability needs.
- Environment: Consider exposure to moisture and potential damage, which may influence insulation type and gauge.
- Safety Margin: Select a wire gauge that provides a safety buffer above your maximum expected load.
Current Load: Knowing the total amperage is crucial because different gauges can safely carry different amounts of current. For example, if your components draw 10 amps, you’ll need to select a wire gauge that can handle that load without overheating or causing voltage drop.
Wire Length: The distance between your power source and the components can affect the gauge you choose. Longer wires can result in voltage drop, so it’s often recommended to use a thicker wire for runs longer than a specific length (usually more than 10 feet).
Type of Wire: Stranded wire is typically preferred for kayaks because it is more flexible and easier to route in tight spaces. Solid wire, while sometimes cheaper, is less flexible and can be more difficult to work with in the confined areas of a kayak.
Environment: Kayaks are often exposed to water and varying weather conditions, so selecting wire with appropriate insulation is essential. Marine-grade wire is designed to resist corrosion and wear, making it a suitable choice for the wet conditions encountered in kayaking.
Safety Margin: It’s always wise to select a wire gauge that exceeds your maximum expected current load. This ensures that even if your equipment operates at peak capacity, the wiring remains safe and reliable, reducing the risk of overheating and potential failure.
What Features Should I Look for in Quality Kayak Wiring?
When searching for the best kayak wiring, consider features that enhance safety, performance, and usability.
- Gauge of Wiring: The wire gauge determines the thickness and current-carrying capacity. For kayak applications, a lower gauge number (like 14 or 16) is often preferred as it can handle higher currents effectively, ensuring that your electrical components receive adequate power without overheating.
- Material Quality: High-quality wiring is typically made from copper, which offers excellent conductivity. Additionally, look for tinned copper wiring as it provides corrosion resistance, making it suitable for wet environments typically encountered in kayaking.
- Insulation Type: Insulation protects the wiring from moisture and abrasion. Marine-grade insulation is ideal as it is designed to withstand harsh marine conditions, preventing deterioration and electrical shorts due to water exposure.
- Connectors and Terminals: Quality connectors and terminals ensure reliable connections between wiring and electrical components. Look for connectors that are waterproof and corrosion-resistant, such as those made from stainless steel or with protective sealing, to maintain a solid electrical connection in wet conditions.
- Flexibility and Length: Wiring should be flexible enough to bend easily during installation and use without breaking. Additionally, ensure that the length of the wire is adequate for your kayak’s layout, allowing for neat and efficient routing without unnecessary tension or slack.
- Protection from Damage: Consider wiring that includes protective sheathing or conduits to guard against abrasion and impact. This is especially important in kayaks, where equipment can shift and bump against wiring during transport or use.
- Voltage Rating: Ensure that the wiring is rated for the voltage of your kayak’s electrical system, typically 12V for most setups. Using wiring that meets or exceeds the voltage requirements will help prevent overheating and potential failure during operation.
How Do I Install Kayak Wiring Safely and Effectively?
To install kayak wiring safely and effectively, consider the following components:
- Wiring Gauge: Selecting the appropriate gauge wire is crucial for both safety and performance.
- Connectors: Using the right connectors ensures secure and reliable connections that can withstand water exposure.
- Battery Placement: Proper placement of the battery is essential for balance and accessibility.
- Waterproofing: Implementing waterproofing measures protects electrical components from moisture damage.
- Fuse Installation: Incorporating a fuse into the wiring system prevents electrical overloads and potential fires.
Wiring Gauge: The gauge of the wire you choose should match the electrical load requirements of your devices. Thicker wires (lower gauge numbers) can handle more current but may be harder to work with, while thinner wires (higher gauge numbers) are easier to manage but may not support high loads effectively.
Connectors: Selecting high-quality, marine-grade connectors is vital for ensuring that your wiring remains intact and functional in wet conditions. Look for connectors that are corrosion-resistant and rated for the specific amperage and voltage of your system to avoid failures.
Battery Placement: The placement of the battery in your kayak should prioritize both weight distribution and ease of access for maintenance and charging. A well-placed battery can enhance the kayak’s stability while ensuring that you can easily reach it when needed.
Waterproofing: To protect your wiring and electrical connections from water damage, use heat shrink tubing or waterproof connectors. Additionally, consider sealing any openings in your kayak where wires exit to prevent water ingress.
Fuse Installation: Installing a fuse in line with your wiring is a critical safety measure that protects your equipment from power surges or shorts. Choose a fuse rated for your system’s maximum current to ensure it will blow before any damage occurs to your devices.
What Are Common Mistakes to Avoid When Wiring a Kayak?
When wiring a kayak, certain common mistakes can lead to safety hazards and equipment failure.
- Improper Gauge Wire: Using wire that is too thin can lead to overheating and potential failure of the electrical system.
- Neglecting Waterproof Connections: Failing to use waterproof connectors can result in corrosion, which may cause electrical failures over time.
- Inadequate Power Supply: Choosing a battery that doesn’t provide sufficient voltage or capacity can lead to underperformance of electrical components.
- Ignoring Wire Routing: Poor wire routing can lead to snagging or abrasion, which can damage the insulation and cause short circuits.
- Skip Testing Connections: Not testing connections before finalizing the installation can lead to discovering faults later, making repairs more complicated.
- Overloading Circuits: Connecting too many devices to a single circuit can overload the system, risking burnout or fire hazards.
- Forgetting to Secure Wires: Loose wires can move around during kayaking, leading to breakage or disconnection, which may leave you without power.
Using wire that is too thin can lead to overheating and potential failure of the electrical system. It’s essential to choose a wire gauge that can handle the expected load, ensuring safety and efficiency.
Failing to use waterproof connectors can result in corrosion, which may cause electrical failures over time. To prevent this, always select connectors that are specifically designed for marine environments.
Choosing a battery that doesn’t provide sufficient voltage or capacity can lead to underperformance of electrical components. Ensure the battery matches the requirements of your devices to maintain optimal functionality.
Poor wire routing can lead to snagging or abrasion, which can damage the insulation and cause short circuits. Plan the wiring layout carefully to avoid any potential hazards during movement.
Not testing connections before finalizing the installation can lead to discovering faults later, making repairs more complicated. It’s wise to verify all connections and functionality before closing up any compartments.
Connecting too many devices to a single circuit can overload the system, risking burnout or fire hazards. Always ensure that circuits are designed to handle the total load of all connected devices.
Loose wires can move around during kayaking, leading to breakage or disconnection, which may leave you without power. Secure all wiring to prevent movement, ensuring a reliable setup while on the water.
How Can I Troubleshoot Common Issues with Kayak Wiring?
Troubleshooting common issues with kayak wiring involves identifying typical problems and applying practical solutions.
- Check Connections: Ensure all wiring connections are secure and free from corrosion. Loose or corroded connections can lead to poor performance or complete failure of electrical components.
- Inspect for Damage: Look for any visible signs of wear or damage in the wiring, such as fraying or cuts. Damaged wires can cause shorts or intermittent issues that may affect the operation of lights or electronics.
- Test the Battery: Verify that the battery is fully charged and functioning properly. A weak or dead battery can lead to low voltage issues, causing inadequate power supply to the kayak’s electrical components.
- Use a Multimeter: Employ a multimeter to measure voltage and continuity in the wiring. This tool helps identify where the electrical flow is interrupted, allowing you to pinpoint specific problems within the wiring system.
- Check Fuses: Inspect any fuses in the wiring system to ensure they are intact and functioning. A blown fuse can interrupt the power supply and is often a simple fix that can restore functionality.
- Waterproofing Measures: Review the waterproofing of connectors and wiring to prevent moisture-related issues. Proper sealing can minimize corrosion and short-circuiting caused by water exposure.
- Consult the Manual: Refer to the kayak’s wiring diagram or manual for specific troubleshooting tips and wiring configurations. Understanding the manufacturer’s guidelines can provide valuable insights for resolving wiring issues effectively.