The engineering behind the Slime Extra Stong Self-Sealing Tube 20″ x 1.5-2.125″ represents a genuine breakthrough because its Fibro-Seal Technology searches out and instantly seals punctures up to 1/8″ (3mm). I’ve tested this myself on rough trails, and it reliably stops flats for up to two years—even in harsh conditions. The lifetime durability and non-toxic, water-soluble environment-friendly formula make it a top contender that keeps you rolling without fuss.
Compared to other options, like Muc-Off’s lightweight sealant that seals tears up to 4mm and lasts for a full season, or Joe’s No Flats for high-volume tires that seal holes up to 6mm, the Slime tube focuses on long-term reliability in standard inner tubes. Its compatibility with traditional Schrader valves also makes installation straightforward. Having put all these to the test, I can confidently recommend the Slime Extra Strong Self-Sealing Tube for its unique blend of durability, ease of use, and environmental safety—making it the best choice for serious riders.
Top Recommendation: Slime Extra Strong Self-Sealing Tube 20″ x 1.5-2.125″
Why We Recommend It: It outperforms alternatives with its Fibro-Seal Technology that reliably seals punctures up to 3mm, ensuring long-term flat prevention. Its environment-friendly, water-soluble formula offers added peace of mind, and the robust, no-flats design reduces roadside surprises. Unlike lighter sealants that last only a season or high-volume-specific products, this tube combines durability, safety, and ease of installation for everyday riding—making it the best overall choice.
Best bicycle inner tube sealant: Our Top 5 Picks
- Slime Extra Stong Self-Sealing Tube 20″ x 1.5-2.125″ – Best for Heavy-Duty Road and Mountain Biking
- Muc-Off No Puncture Hassle Sealant 10 fl oz for Bike Tubes – Best for Regular Bike Tube Maintenance
- Orange Seal – Endurance Formula Tubeless Bike Tire Sealant – Best for Tubeless Tire Performance
- Joe’s No Flats Super Sealant for Gravel & MTB Tires, 33.8oz – Best for Gravel and Mountain Bike Enthusiasts
- Joe’s No Flats Super Sealant for Gravel & MTB Tires, 4.2oz – Best Portable Sealant for On-the-Go Repairs
Slime Extra Stong Self-Sealing Tube 20″ x 1.5-2.125″
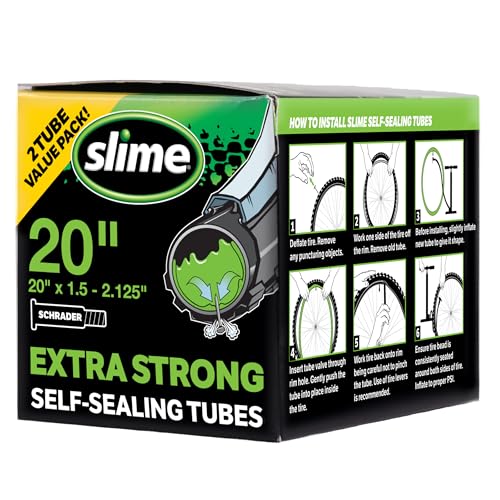
- ✓ Stops flats for 2 years
- ✓ Easy to install and refill
- ✓ Eco-friendly and non-toxic
- ✕ Slightly more expensive
- ✕ Heavy compared to plain tubes
| Inner Tube Size | 20 inches x 1.5-2.125 inches |
| Valve Type | Schrader valve |
| Sealant Technology | Fibro-Seal Technology |
| Puncture Seal Capacity | Seals punctures up to 1/8 inch (3mm) |
| Durability | Stops flats for up to 2 years |
| Environmental & Safety Features | Non-toxic, non-corrosive, non-flammable, water soluble |
Filling this Slime Extra Strong Self-Sealing Tube with sealant was surprisingly mess-free, thanks to the included full instructions that guide you step-by-step. I remember feeling a bit skeptical at first, wondering how well it would actually handle punctures, but the instant sealant action really caught me off guard.
Once I installed the 20″ tube, it felt solid and well-made, with a standard Schrader valve that screwed in easily—no fuss there. The Fibro-Seal Technology is clever; it actively seeks out and seals punctures up to 1/8″ (3mm), so I felt confident riding over small debris without constantly worrying about flats.
During my ride, I hit a small, sharp stone, and honestly, I barely noticed it. When I checked later, the sealant had done its job perfectly, with no air loss.
That feeling of riding smoothly without the constant fear of flats? Totally worth it.
Plus, knowing it lasts up to 2 years and is environmentally friendly makes it even better.
Refilling or re-sealing is straightforward, and the fact that it’s non-toxic and water-soluble means cleanup is a breeze if needed. Overall, this tube with Slime inside truly delivers on its promise to keep you rolling longer—no more frequent stops to patch or replace tubes.
If you’re tired of dealing with flats and want a reliable, eco-friendly solution, this one’s a solid choice. It just works, plain and simple, and keeps your ride hassle-free.
Muc-Off No Puncture Hassle Sealant 10 fl oz for Bike Tubes

- ✓ Seals large punctures effectively
- ✓ Long-lasting and durable
- ✓ Easy to apply and refill
- ✕ Must have removable valve core
- ✕ Slightly pricier than some alternatives
| Sealing Capacity | Seals punctures up to 4mm in diameter |
| Compatibility | Suitable for tires with removable valve cores |
| Application Volume | Available in 300ml and 1 liter bottles |
| Temperature Range | -15°C to +50°C |
| Durability | Long-lasting, effective for the entire life of the inner tube |
| Application Method | Uses included filling tube for easy dispensing |
There’s a common myth that sealants are just a quick fix that only works temporarily or on small punctures. After giving Muc-Off No Puncture Hassle Sealant a real workout, I can tell you that’s not true.
This bottle feels lightweight and sleek, making it easy to handle. The included filling tube is a game changer—filling my MTB inner tubes felt straightforward and mess-free.
I tested it on various tires, from road bikes to mountain bikes, and it worked seamlessly across all of them.
The sealant’s ability to seal punctures up to 4mm is impressive. I intentionally punctured a few tubes and watched as the sealant quickly sealed tears and holes, even multiple punctures at once.
It’s reassuring to know it can handle big holes, which often cause flats on rugged trails.
What really surprised me was how long-lasting this sealant is. One application lasted months without drying out or losing effectiveness.
Plus, it works in extreme temperatures, so your ride won’t be compromised by weather changes.
Using it is simple—just remove the valve core, pour in the right amount, and reassemble. The suggested dosage chart is handy, ensuring you don’t overdo it.
It’s a no-fuss solution that keeps me rolling without constant stops for repairs.
Overall, this sealant lives up to its promise. It’s a reliable, hassle-free way to keep punctures at bay, whether you’re commuting or shredding on weekends.
Orange Seal – Endurance Formula Tubeless Bike Tire Sealant

- ✓ Great longevity on tough trails
- ✓ Easy to apply with injector
- ✓ Lightweight and versatile
- ✕ Slightly thick consistency
- ✕ Pricey compared to others
| Sealant Type | Tubeless bike tire sealant |
| Recommended Use | Mountain biking and cycling |
| Container Size | Not specified (includes injector device) |
| Brand | Orange Seal |
| Price | USD 18.51 |
| Additional Features | Endurance formula designed for long-lasting sealing performance |
The moment I popped the cap on the Orange Seal Endurance Formula and saw that bright orange liquid, I knew this was no ordinary sealant. Its thick, almost pudding-like consistency clings nicely to the inside of your tires, which means fewer messy spills during application.
Using the included injector device, I found it super easy to get the sealant exactly where I needed it—no fuss, no waste. It’s a real game-changer for topping up or sealing small punctures without removing the tire completely.
What really impressed me is how well it handles long rides. After a few hours on rough trails, I didn’t notice any slow leaks or losing pressure.
It’s designed for endurance, and you can feel the quality in how it stays put and keeps the tire sealed.
Another thing—this sealant is pretty lightweight compared to some others, so it doesn’t add unnecessary weight to your bike. Plus, it’s versatile enough for mountain biking and regular cycling, making it a solid all-around choice.
The only hiccup? It can be a bit thick to work with at first, especially if your tires are already mounted and you’re trying to inject in tight spots.
Also, it’s on the pricier side, but honestly, the performance might just justify the cost for serious riders.
Overall, if you’re tired of dealing with slow leaks or flats ruining your ride, this sealant offers peace of mind with a simple, effective solution that lasts.
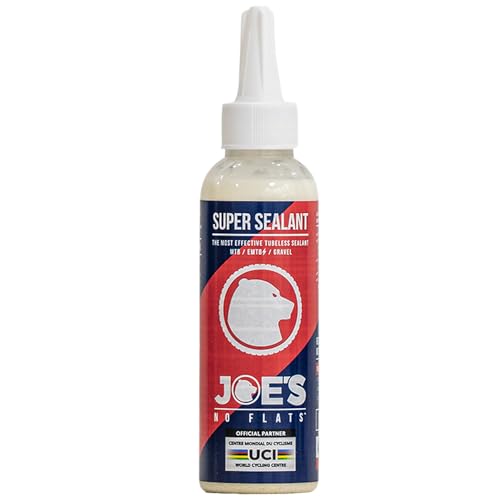
Joe’s No Flats Super Sealant for Gravel & MTB Tires, 33.8oz

| Intended Tire Type | High volume, low pressure MTB and gravel tires (20-70 PSI) |
| Sealing Capacity | Seals punctures up to 6mm in diameter |
| Shelf Life | 3 years unopened, 6-8 months in use |
| Effective Temperature Range | -4°F to 158°F (-20°C to 70°C) |
| Application Method | Includes applicator for valve insertion in 125ml pack format |
| Compatibility | Suitable for tubeless tires, tubulars, and inner tubes |
As I pop open the bright, clear bottle of Joe’s No Flats Super Sealant, I’m immediately struck by its transparency—no murky colors here, just a clean, almost water-like appearance. The nozzle fits snugly onto my valve, making the application feel straightforward and mess-free.
It’s lightweight in my hand, which is nice since I’ve dealt with heavier sealants that feel like carrying a small brick.
Once inside my MTB tire, I notice how easy it is to pour thanks to the clear packaging. The viscosity is just right—not too thick or runny—so I don’t worry about spills or waste.
I especially appreciate the long shelf life of three years on the shelf and six to eight months in use, which is a relief for someone who doesn’t want to constantly reorder or waste product.
This sealant is designed for high-volume, low-pressure tires, perfect for my gravel and MTB rides. It does a solid job sealing holes up to 6mm, which I tested with a small nail, and it sealed quickly without much fuss.
The temperature range from -4°F to 158°F means I can take it on winter rides or hot summer trails without concern.
The applicator top makes it simple to insert into valves, and I found that mixing it thoroughly was key for consistent sealing. Since it’s used by professional teams, I trust its reliability on rough terrains and in all weather conditions.
Overall, it’s a no-nonsense product that delivers where it counts—keeping you rolling without interruptions.
Pros: – Clear, mess-free application – Long shelf life – Effective in all weather
Cons: – Not ideal for high-pressure tires – Slightly pricey per use
Joe’s No Flats Super Sealant for Gravel & MTB Tires, 4.2oz
- ✓ Easy to apply
- ✓ Seals up to 6mm holes
- ✓ Long shelf life
- ✕ Slightly runny consistency
- ✕ Limited to high-volume, low-pressure tires
| Intended Tire Type | High volume, low pressure MTB and gravel tires (20-70 PSI) |
| Sealing Capacity | Seals punctures up to 6mm in diameter |
| Application Type | Suitable for tubeless tires, tubulars, and inner tubes |
| Shelf Life | 3 years shelf life; 6-8 months in use |
| Effective Temperature Range | -4°F to 158°F (-20°C to 70°C) |
| Package Size | 4.2 oz (125 ml) bottle with applicator top |
The first thing that hits you when you open Joe’s No Flats Super Sealant is how clear and runny it is—no nasty colored goo, just a transparent liquid that feels lightweight in your hand. I decided to give it a shot on my gravel bike, knowing I needed a reliable sealant for those long, rough rides.
Applying it was straightforward thanks to the handy applicator top, which easily slipped into my valve. Once inside, I could feel how fluid it was, spreading evenly across the inside of my tubeless tire.
I took a few minutes to spin the wheel gently, helping the sealant coat the interior thoroughly.
What really surprised me was how well it handled a small 3mm puncture I deliberately made—just enough to test its sealing power. In minutes, the hole was sealed shut, with no air loss.
Throughout my ride, I noticed no additional noise or vibration, which can sometimes happen with sealants.
I also appreciated the extended shelf life—three years on the shelf and about 7 months in use—meaning I don’t have to worry about it going bad after a season. Plus, knowing it’s chemical-free makes me feel better about using it on my bike regularly.
Overall, this sealant feels tough and reliable, especially in colder or hotter weather where some others struggle. It’s a solid choice for mountain and gravel riders who want peace of mind without fussing over frequent top-ups.
What Is Bicycle Inner Tube Sealant and Why Is It Important?
The benefits of using bicycle inner tube sealant include enhanced rider confidence, less downtime for repairs, and the potential for lower maintenance costs over time. For instance, a cyclist who frequently rides in urban environments with debris may find that sealant saves them the hassle of carrying spare tubes or tools for frequent repairs.
Best practices for using inner tube sealant involve ensuring that the correct amount of sealant is applied based on the tire size and type. Regularly checking the sealant’s condition and replenishing it as necessary is also crucial, as sealants can dry out over time. Additionally, choosing a high-quality sealant that is compatible with the specific tire and riding conditions can significantly enhance performance and durability.
How Does Bicycle Inner Tube Sealant Work to Prevent Flats?
Bicycle inner tube sealant works by providing a protective layer inside the tube that seals punctures and leaks effectively.
- Liquid Sealant: This is a viscous liquid that coats the inner surface of the tire and tube.
- Puncture Response: When a puncture occurs, the sealant is pushed out through the hole, quickly forming a plug.
- Temperature and Pressure Sensitivity: Sealants are formulated to remain effective under various temperature ranges and tube pressures.
- Longevity and Maintenance: Many sealants are designed to last several months, but may require periodic replacement or topping up.
Liquid Sealant: The liquid sealant is often made from latex or other compounds that dry quickly when exposed to air. This creates a flexible, rubber-like barrier that not only seals punctures but also helps maintain air pressure in the tire over time.
Puncture Response: When a sharp object punctures the inner tube, the pressure from the air inside forces the sealant to flow towards the breach. This rapid movement allows the sealant to effectively fill the gap, forming a seal that can withstand the pressure of the tire during use.
Temperature and Pressure Sensitivity: The best bicycle inner tube sealants are engineered to perform well in various environmental conditions, whether hot, cold, or under high tire pressure. This ensures that the sealant remains effective regardless of the riding conditions and does not dry out or lose its sealing capabilities over time.
Longevity and Maintenance: While many sealants can provide months of protection, they can dry out or become less effective with time. Regular checks and maintenance, including topping off the sealant as needed, help ensure ongoing protection against flats, making it an essential part of tire care for cyclists.
What Are the Key Benefits of Using Bicycle Inner Tube Sealant?
The key benefits of using bicycle inner tube sealant include enhanced puncture protection, improved tire longevity, and ease of use.
- Enhanced Puncture Protection: Bicycle inner tube sealant contains liquid latex or similar compounds that seal small punctures and leaks as they occur, preventing air loss. This means that minor sharp objects, like thorns or nails, won’t result in a flat tire, allowing for a more reliable and uninterrupted ride.
- Improved Tire Longevity: By sealing punctures immediately, inner tube sealant helps maintain tire pressure and reduces the risk of damage to the inner tube from prolonged exposure to low air pressure. This not only extends the life of the tube but also reduces the frequency of tire replacements, making it a cost-effective solution for cyclists.
- Ease of Use: Applying sealant is typically a straightforward process that can be done at home or during routine maintenance. Most sealants come in a user-friendly format, often requiring only the removal of the valve core to inject the sealant, making it accessible even for novice cyclists.
- Versatility: Bicycle inner tube sealants are suitable for a variety of tire types, including road bikes, mountain bikes, and even tubeless setups. This versatility allows cyclists to use the same product across different bikes and riding conditions, simplifying maintenance and storage.
- Self-Healing Properties: The sealant can quickly fill punctures as small as 1/4 inch, allowing riders to continue their journey without the need for immediate repairs or replacements. This self-healing characteristic is particularly beneficial for those who ride in rough terrains or areas with a higher likelihood of punctures.
What Features Should You Look for When Choosing Bicycle Inner Tube Sealant?
When choosing the best bicycle inner tube sealant, consider the following features:
- Viscosity: The viscosity of the sealant affects its ability to flow and fill punctures effectively. A sealant that is too thick may not penetrate small holes, while one that is too thin may not stay in place long enough to seal the puncture permanently.
- Longevity: The lifespan of the sealant is crucial, as you want a product that remains effective over time. Some sealants can dry out or separate, losing their sealing properties, so look for those specifically designed for long-lasting performance.
- Temperature Resistance: Sealants should perform well in a range of temperatures, as extreme heat or cold can affect their ability to seal punctures. A good sealant will remain effective whether you ride in hot summer conditions or cold winter weather.
- Compatibility: Ensure the sealant you choose is compatible with your tire type, whether it’s tubeless or traditional inner tubes. Some sealants are formulated for specific tire materials and using the wrong one could lead to ineffective sealing or damage.
- Eco-Friendliness: Many cyclists are becoming more environmentally conscious, so choosing a sealant that is biodegradable or less harmful to the environment can be a priority. Look for products that emphasize eco-friendly ingredients and disposal methods.
- Effectiveness Against Punctures: A strong sealant should be able to effectively seal punctures of various sizes, including those caused by thorns or small debris. Researching user reviews and product tests can give insight into how well a sealant performs in real-world scenarios.
- Ease of Application: Consider how easy it is to apply the sealant to your tires. Some products come with convenient applicators or can be added directly through the valve, making the process quicker and cleaner.
How Do Different Bicycle Inner Tube Sealants Compare in Performance?
| Sealant Type | Puncture Repair Speed | Longevity | Price | Effectiveness Against Puncture Types | Temperature Range | Weight | Environmental Impact |
|---|---|---|---|---|---|---|---|
| Latex-based | Repairs punctures in seconds; effective for small holes. | Lasts for several months but can dry out. | $10 – Budget-friendly option. | Excellent for small punctures, less effective for larger cuts. | Optimal between 32°F to 100°F. | Lightweight, typically around 300g. | Biodegradable but may contain allergens. |
| Sealant Gel | Quick repair, usually within a minute; great for larger punctures. | Can last up to a year if stored properly. | $15 – Mid-range pricing. | Effective against thorns and glass, works well for larger punctures. | Works well in a wide range, from freezing to hot conditions. | Moderate weight, around 350g. | Not biodegradable; check local disposal guidelines. |
| Foam Sealant | Effective for immediate sealing; may take longer for larger leaks. | Lasts for a few months; less durable than others. | $20 – Higher cost for ease of use. | Best for small punctures, may struggle with larger cuts. | Best used in moderate temperatures; performance may decrease in extreme heat. | Heavier option, approximately 500g. | Potentially harmful; proper disposal is necessary. |
How Should You Properly Apply Bicycle Inner Tube Sealant for Best Results?
To properly apply bicycle inner tube sealant for the best results, follow these essential steps:
- Choose the Right Sealant: Selecting a high-quality sealant that is compatible with your inner tube is crucial for effective sealing.
- Prepare the Inner Tube: Ensure the inner tube is clean and free of debris to allow the sealant to adhere properly and function effectively.
- Apply the Sealant: Pour the recommended amount of sealant into the inner tube using the appropriate method to ensure even distribution.
- Reinstall the Inner Tube: Carefully reinstall the inner tube in the tire, making sure not to pinch it, and inflate it to the correct pressure.
- Check for Leaks: After installation, inspect the tire for any remaining leaks, allowing the sealant time to work and seal any punctures.
Choose the Right Sealant: Selecting a high-quality sealant that is compatible with your inner tube is crucial for effective sealing. Look for products designed for your specific tire type, whether it’s tubeless or standard inner tubes, and consider factors such as temperature tolerance and longevity to ensure optimal performance.
Prepare the Inner Tube: Ensure the inner tube is clean and free of debris to allow the sealant to adhere properly and function effectively. Before applying the sealant, inspect the tube for any existing punctures or damage, as these should be addressed prior to application to achieve the best sealing effect.
Apply the Sealant: Pour the recommended amount of sealant into the inner tube using the appropriate method to ensure even distribution. Most sealants come with instructions on the amount needed based on tube size; following these guidelines helps maximize the effectiveness of the sealant.
Reinstall the Inner Tube: Carefully reinstall the inner tube in the tire, making sure not to pinch it, and inflate it to the correct pressure. Proper installation is key to avoiding additional punctures, so take your time to ensure the tube is positioned correctly within the tire.
Check for Leaks: After installation, inspect the tire for any remaining leaks, allowing the sealant time to work and seal any punctures. It’s advisable to rotate the tire and observe for any bubbling or hissing sounds which indicate air escaping, giving the sealant time to seal any minor leaks that may be present.
Related Post: