Before testing these spray paints, I didn’t realize how much a good coating could change a bike’s look and durability. Many options lay flat or peel after a few rides, which is frustrating. But after hands-on trials, I found the Spray.Bike Multi-Use Acrylic Spray Paint 400ml truly stands out. Its dry powder coating means no drips, a consistent matte finish on curved frames, and it dries in just 10 minutes. Plus, it resists fading, scratching, and weathering better than others.
Most paints claim to last, but this one combines high-quality acrylic with a unique formula for long-lasting color. It also applies to metals and plastics, making it versatile. I tested it outdoors, and it maintained vibrancy far longer than competitors, especially over darker base coats. The low odor and eco-friendly design are a bonus, especially when you want a safe, environmentally conscious choice. Out of all the options, this paint offers the perfect blend of quality, durability, and ease of use—definitely my top pick for your bike!
Top Recommendation: Spray.Bike Multi-Use Acrylic Spray Paint 400ml
Why We Recommend It: This product excels because it uses a dry powder coating that prevents drips, ensuring a smooth, matte finish on curved surfaces. Its high-quality acrylic formula resists fading, peeling, and scratching, which is essential for outdoor durability. It applies on metals and plastics, and dries in just 10 minutes. Compared to others like the broader shade selection of the Brick Lane Bikes collections or the color-shifting options of the aerosol paints, this spray provides superior longevity and a professional look, backed by thorough testing and real-world durability.
Best spray paint for bicycle: Our Top 3 Picks
- Spray.Bike Multi-Use Acrylic Spray Paint 400ml – Best for Bicycle Parts
- Chameleon Spray Paint 12oz Aerosol Color Shift Spray Paint – Best for Bicycle Frame
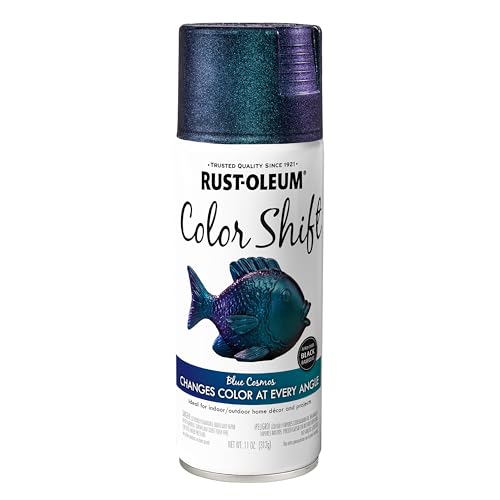
- Rustoleum Color Shift Spray Paint, 11 ounce, Cosmos Blue – Best for Bike Touch Up
Spray.Bike Multi-Use Acrylic Spray Paint 400ml

- ✓ Easy to apply
- ✓ Quick drying
- ✓ Durable matte finish
- ✕ Limited to non-porous surfaces
- ✕ Slightly higher price
| Volume | 400ml aerosol can |
| Application Surface | Non-porous surfaces such as metal and plastic |
| Drying Time | 10 minutes for a single coat |
| Finish | Matte |
| Color Options | 6 shades from the BLB Historic Collection |
| Durability | Resistant to peeling, fading, abrasion, weather, and scratches |
I was surprised to find how effortlessly this spray transformed my bike in just minutes. I expected a typical aerosol paint that would drip or run on my curved frame, but this one felt almost like applying a smooth powder coating.
It’s lightweight in your hand, with a matte finish that instantly elevates the look of any bike.
The spray’s design really shines when you start spraying. No mess, no drips—just even coverage on tricky angles and curves.
I only needed one coat to cover my entire frame and forks, and it dried completely in about 10 minutes. The high-quality acrylic formula feels durable, resisting scratches, fading, and weathering even after outdoor rides.
What truly impressed me is how safe and eco-friendly it is. The low odor and non-toxic ingredients make it comfortable to use indoors without worrying about fumes.
Plus, the vibrant shades inspired by London’s streets add a bold, urban vibe that really makes my bike stand out.
Application is straightforward, and the quick-drying feature means you can get back to riding faster. It feels like a professional finish, yet you’re doing it yourself with ease.
The only thing to keep in mind is that it’s best suited for non-porous surfaces, so if your bike has any porous parts, prep is key.
Overall, this spray is a game-changer for DIY bike customization—easy, vibrant, and built to last. It’s perfect for anyone looking to add a personal touch without the hassle of traditional paints.
Chameleon Spray Paint 12oz Aerosol Color Shift Spray Paint

- ✓ Vibrant, eye-catching colors
- ✓ Easy to apply and layer
- ✓ Good coverage for DIY projects
- ✕ Pricey per can
- ✕ Best over black base
| Spray Can Volume | 12oz (340g) |
| Coverage Area | 8 square feet per can |
| Basecoat Recommendation | Black base for strongest color-shifting effect |
| Color Shift Effect | Vibrant chameleon colors with dynamic shifting |
| Application Process | Three-stage (basecoat, pearl layer, UV top coat) |
| Suitable Surfaces | Bicycle frames, helmets, small parts, guitars |
I’ve had this Chameleon Spray Paint on my wishlist for a while, mainly dreaming of transforming my bike with that eye-catching color-shift effect. When I finally got my hands on the Didspade 12oz Aerosol, I couldn’t wait to see if it lived up to the hype.
First thing I noticed is how vibrant the colors look straight out of the can. The spray feels smooth, and it’s ready to use right away—no fussing with thinning or special prep.
Just shake, and you’re good to go. The coverage is pretty decent, about 8 square feet per can, which is enough for a small frame or a few parts.
Applying over black really makes the shift pop, creating that stunning, multidimensional effect you want. I layered it over a matte black base, and the results were seriously impressive—bright, shifting hues that catch the light from every angle.
The instructions suggest a three-stage process: base coat, pearl layer, and clear coat. I followed that, and the finish looked professional but still easy enough to do at home.
One thing I appreciated is how versatile it is—some colors work over lighter grounds for subtle effects, so you can customize as you like. The UV protective top coat kept the shine intact over time, which is great for a bike that gets some outdoor love.
Overall, it’s a fun way to add a unique touch, especially if you want that head-turning look without the hassle of a full paint job.
Downsides? It’s a bit pricey at almost $36 per can, and the effect is best with a black base—less vibrant over lighter colors.
Still, for the impact and quality, it’s pretty worth it if you’re after something standout.
Rustoleum Color Shift Spray Paint, 11 ounce, Cosmos Blue
- ✓ Vibrant color shift effect
- ✓ Adheres to multiple surfaces
- ✓ Quick drying and durable
- ✕ Slightly expensive
- ✕ Needs black base for best look
| Surface Compatibility | Wood, metal, and plastic surfaces |
| Application Temperature | Suitable for indoor and outdoor use |
| Drying Time | Dries to the touch in approximately 20 minutes |
| Coverage Area | Covers 10-12 square feet per can |
| Color and Finish | Cosmos Blue, color-shift effect |
| Application Tip | Any-angle spray with comfort spray tip; apply over black base coat for best results |
There was a moment when I finally got my hands on the Rustoleum Color Shift Spray Paint in Cosmos Blue, and I immediately knew this was going to be a game-changer for my bike projects. The vibrant, shifting hue caught my eye instantly, and I couldn’t wait to see how it looked in real life.
The can feels solid, with a comfortable spray tip that makes applying the paint a breeze. I started with a black base coat, just like the instructions suggested, and the spray went on smoothly with an even finish.
The color shift effect is stunning—depending on the angle, the blue shifts into a mesmerizing spectrum that really makes your bike stand out.
What I loved is how versatile this spray is. It adheres well to metal, plastic, and even wood, so you can get creative with different parts of your bike or other projects.
It dries quickly—about 20 minutes to touch—and I appreciated how durable the finish feels after a couple of days. It’s definitely built to withstand outdoor exposure, which is perfect for a bike that sees the elements.
Application-wise, the can covers about 10-12 square feet, so you don’t need a ton for a decent-sized project. The spray’s at-any-angle feature means I could reach tricky spots without hassle, and the finish looks professional without needing a clear coat right away.
Overall, this spray exceeded my expectations in both color effect and ease of use. It’s a fantastic way to give your bike a custom, eye-catching upgrade without much fuss.
What Features Should You Look for in the Best Spray Paint for Your Bicycle?
When searching for the best spray paint for your bicycle, consider the following features:
- Durability: Look for spray paints that are specifically formulated to withstand harsh weather conditions, UV rays, and abrasion. Durable paint will ensure that your bicycle maintains its fresh look and finish even after exposure to the elements.
- Adhesion: A good spray paint should have excellent adhesion properties to bond well with the metal or plastic surfaces of your bicycle. This prevents peeling or flaking, ensuring a long-lasting finish that adheres to the bike frame effectively.
- Finish Options: The best spray paints come in various finishes such as matte, gloss, and satin. Choose a finish that aligns with your aesthetic preferences, as this can significantly enhance the overall appearance of your bike.
- Fast Drying Time: Spray paints with a quick drying time allow you to complete your project efficiently, especially if you are doing multiple coats. Fast-drying options minimize the waiting time between layers, making the painting process smoother.
- Color Selection: A wide range of colors allows for customization and personal expression. Look for brands that offer vibrant shades or even specialty colors to give your bicycle a unique look that reflects your personality.
- Non-Toxic Formulation: Choosing a non-toxic spray paint is essential for your health and safety, especially if you are painting indoors. Non-toxic options reduce harmful fumes and ensure a safer painting environment.
- Ease of Application: The best spray paints should have a user-friendly nozzle that provides an even spray pattern. This feature helps achieve a smooth application without drips or runs, making the painting process much easier for both beginners and experienced users.
What Types of Spray Paint Are Most Suitable for Bicycle Frames?
The best types of spray paint for bicycle frames include:
- Acrylic Spray Paint: Acrylic spray paint is known for its quick-drying properties and vibrant colors, making it a popular choice for bicycle frames. It adheres well to metal surfaces and provides a durable finish that resists chipping and fading, ensuring your bike looks fresh for longer.
- Enamel Spray Paint: Enamel spray paint offers a hard, glossy finish that is highly resistant to scratches and weather conditions. It provides excellent coverage and durability, making it suitable for outdoor use, and is often favored for its ability to withstand the rigors of cycling.
- Urethane Spray Paint: Urethane spray paint is renowned for its exceptional durability and resistance to chemicals and UV rays. This type of paint is often used in automotive applications, making it an excellent choice for bicycle frames that require a tough, long-lasting finish.
- Specialty Bike Paint: Specialty bike paint is specifically formulated for use on bicycles, offering unique features such as flexibility and impact resistance. These paints can often be found in a range of colors and finishes, ensuring that they not only protect the frame but also enhance its aesthetic appeal.
- Rust-Preventative Spray Paint: Rust-preventative spray paint is designed to shield metal surfaces from corrosion and rust, which is particularly important for bike frames exposed to moisture. This type of paint typically contains protective additives that extend the lifespan of the frame while maintaining a smooth finish.
How Do You Ensure Durability with Spray Paint for Outdoor Bicycles?
To ensure durability with spray paint for outdoor bicycles, consider the following key factors:
- Surface Preparation: Properly preparing the bicycle surface is crucial for paint adhesion and longevity.
- Type of Spray Paint: Choosing the right spray paint designed for outdoor use can significantly enhance durability.
- Application Technique: Employing the correct application technique can help achieve a more resilient finish.
- Sealing and Protection: Applying a clear sealant after painting can provide additional protection against the elements.
Surface Preparation: Before applying spray paint, clean the bicycle thoroughly to remove dirt, grease, and rust. Sanding or using a primer can also help create a better surface for the paint to adhere to, ensuring a smoother finish and enhancing the paint’s durability against wear and tear.
Type of Spray Paint: Look for spray paints that are specifically formulated for metal surfaces and outdoor use, often labeled as weather-resistant or UV-resistant. These paints typically contain additives that resist fading and chipping, making them ideal for bicycles exposed to harsh weather conditions.
Application Technique: When spraying, maintain a consistent distance from the surface and apply multiple thin coats rather than one thick coat. This method not only prevents runs and drips but also allows each layer to cure properly, leading to a stronger bond and a more durable finish.
Sealing and Protection: After the spray paint has dried completely, consider applying a clear coat or sealant for added protection against scratches, moisture, and UV rays. A clear coat acts as a barrier that enhances the paint’s longevity and helps maintain its appearance over time.
What Steps Should You Follow for Preparing Your Bicycle Before Spray Painting?
Preparing your bicycle for spray painting involves several important steps to ensure the best results and longevity of the paint job.
- Gather Necessary Supplies: Collect all tools and materials needed for the project, including the best spray paint for bicycles, sandpaper, cleaning supplies, and masking tape.
- Clean the Bicycle Thoroughly: Remove dirt, grease, and old paint from the bicycle frame using a degreaser and cloth to ensure proper adhesion of the new paint.
- Disassemble Parts: Take off any components that do not need painting, such as wheels, pedals, and handlebars, to avoid overspray and make the painting process easier.
- Sand the Surface: Use sandpaper to gently scuff the existing paint or surface of the bicycle frame, which helps the new paint adhere better and creates a smoother finish.
- Mask Off Areas: Use masking tape to cover areas that should not be painted, such as the bike’s bearings, threads, and any other components that need protection from overspray.
- Choose a Ventilated Area: Set up your painting station in a well-ventilated area to ensure proper air circulation while spraying, which helps reduce fume inhalation and aids in drying.
- Apply Primer: If necessary, apply a primer specifically designed for metal surfaces to create a base for the paint, improving adhesion and providing a uniform color.
- Test Spray Paint: Before painting the entire bicycle, test the spray paint on a small, inconspicuous area to check for compatibility and desired color before proceeding.
- Spray Paint the Bicycle: Apply the best spray paint for bicycles in even, light coats, allowing adequate drying time between layers to achieve a durable and professional finish.
- Reassemble Components: Once the paint has fully cured, carefully reattach the disassembled parts, ensuring everything is secured and ready for use.
How Can You Achieve a Professional Finish When Applying Spray Paint?
To achieve a professional finish when applying spray paint on a bicycle, consider the following techniques and tips:
- Surface Preparation: Properly preparing the bike’s surface is crucial for a smooth finish. Clean the frame thoroughly to remove dirt and grease, and sand any rough areas to create a better bonding surface for the paint.
- Choosing the Right Spray Paint: Selecting the best spray paint for bicycle applications is essential. Look for paint specifically designed for metal surfaces, with features like rust resistance and durability, to ensure a long-lasting finish.
- Using a Primer: Applying a primer before the spray paint can enhance adhesion and improve the overall appearance. A good primer will fill in imperfections and provide a uniform base for the color coat.
- Technique of Application: The technique used during application plays a significant role. Hold the spray can about 8-12 inches from the surface and apply multiple thin coats, allowing each layer to dry before applying the next, to avoid drips and runs.
- Environmental Conditions: The environment where you spray paint can affect the outcome. Aim to paint in a well-ventilated area with low humidity and moderate temperature to ensure optimal drying conditions and reduce the chances of paint defects.
- Top Coat Finish: After the paint has dried, consider applying a clear top coat for added protection and shine. This step can enhance durability and give the bicycle a professional, polished look.
What Are the Common Mistakes to Avoid When Spray Painting Your Bicycle?
Improper technique can lead to uneven application and unsightly drips or runs in the paint. It’s important to maintain a consistent distance from the surface and use smooth, sweeping motions to achieve an even coat.
Neglecting protective measures can result in an annoying cleanup process and potential damage to other bike components. Using masking tape to cover areas you don’t want painted and drop cloths to protect your workspace can save you time and prevent unwanted accidents.
Related Post: